

Roll Your Way to Fitness: 15 Effective Foam Roller Exercises
Woke up with a stiff neck?
Can’t feel your quads after your last football game?
A foam roller (a.k.a. stretch roller, exercise roller, yoga roller, body roller) might be just the thing you need!
While foam rollers might just look like little cylinders, these bad boys can do everything from removing those stubborn knots in your muscles and improving your joints’ range of motion to easing muscle pain and soreness.
Whether you’re looking for foam roller exercises for your hamstrings, upper back, lower back, shoulders, or just about any muscle group, this blog has got you covered.
So, grab your yoga roller and let’s roll the stress and knots away!
What is foam rolling?
Foam rolling, also known as self-myofascial release (SMR), is a form of self-massage and stretching technique used to release muscle tension and tightness.
Apart from working your muscles, foam rolling also helps to work your fascia (soft connective tissues surrounding your muscles) which commonly become tight and stiff due to poor posture, intense exercise, stress, and other factors. The result: Better muscle function and mobility!
Benefits of foam rolling
An exercise roller…
1. Reduces muscle pain and soreness
Feeling sore after an intense workout? Foam rolling can help!
A study published in the Journal of Athletic Training shows that foam rolling after exercise helps in reducing delayed-onset muscle soreness.
Foam roller stretches increase the blood flow to your muscles thus providing them with more oxygen and nutrients which helps in quicker recovery. It also aids in eliminating toxic waste products from your muscles.
2. Increases the range of motion
When you foam roll, signals are sent to your parasympathetic nervous system to ease the tension in the muscles and tendons. When this happens, the parasympathetic nervous system sends back signals to your muscles causing the muscle fibers to elongate. This leads to an increase in the range of motion around the joints that that specific muscle controls, which in turn improves mobility.
3. Breaks down myofascial scar tissues
Whenever you experience muscle injuries, myofascial scar tissues are formed as part of your body’s healing process. These scar tissues are typically not as organized as your original muscle fibers leading to muscle stiffness and reduced flexibility.
Excessive buildup of scar tissue can even adhere to the surrounding structures causing pain and muscle imbalances.
Fortunately, foam roller stretches can help improve your muscle function by breaking up adhesions and promoting the realignment of collagen fibers.
4. Is a great warm-up tool
Foam rolling before your workout can help to warm up your muscles due to the heat created by the friction of rolling. Research also shows that foam rolling is an effective pre-exercise technique within the athletic population.
5. Eases fibromyalgia symptoms
Pain and tenderness throughout the body. Fatigue. Sleep, memory, and mood issues. The symptoms of fibromyalgia (a chronic disorder) can be debilitating.
Foam rollers offer some hope, though.
A small 2017 study shows that when people suffering from fibromyalgia tried self-myofascial release techniques for 20 weeks, they experienced less pain, fatigue, stiffness, and depression compared to those who didn’t.
You might like: 9 Ways To Use Yoga Props
Tips on how to use a foam roller
1. Position yourself
Sit or lie down with the foam roller placed beneath the targeted muscle group. For instance, if you are rolling out your quads, lie face down with your thighs resting on the foam roller.
2. Apply pressure
Press your body down against the foam roller so that you have adequate pressure on the targeted muscle group. To increase the pressure, shift more weight onto the foam roller, and to decrease it, use your hands or legs to support some of your body weight.
3. Roll
Roll slowly and smoothly along the muscle. When you find a tight spot, roll over that area for 30-60 seconds to loosen it up. DO NOT roll directly over bony areas or joints.
4. Adjust
If you find it hard to roll over any tender spot, shift the roller to the adjacent area to eventually loosen up the whole area.
5. Relax and breathe
Keep your muscles relaxed while rolling to avoid cramps. Don’t forget to keep breathing as you roll.
6. Stop if it hurts
Foam rolling might feel a tad uncomfortable if your muscles are super tight. But if you ever experience intense pain, stop immediately and consult with your doctor before attempting it again.
You might like: 25 Captivating Yoga Captions That Will Invoke Mindfulness Within You
15 Best Foam Roller Exercises
Foam roller exercises for legs / lower body
1. Hamstrings
Foam rolling your hamstrings helps to ease hamstring tightness and to reduce back pain and knee pain.

How to perform
- Sit on the ground with your left leg extended. Place a foam roller beneath your left thigh.
- Bend your right knee so that your foot is resting on the floor.
- Position your hands behind you for support.
- Lift your butt off the ground slightly and slowly roll up and down from just above the knee to the lower part of your butt.
- Roll for 30-60 seconds on your left leg and then switch sides.
Tip
Cross your support leg over the working leg for a deeper massage.
2. Quadriceps
A must-do stretch roller exercise before you crank out those deadlifts and split squats on leg day! The quads roll out is great for loosening up the trigger points in your quads and enhancing your hip and knee mobility.
How to perform
- Lie face down and place a foam roller under your left thigh.
- Use your arms and your right leg to support your body.
- Now slowly roll up and down from above your knee to your hip.
- Roll for 30-60 seconds on the left leg and then switch legs.
3. Calf
This foam roller exercise for legs is great for enhancing flexibility and releasing tension from your calf muscles after activities such as cycling, running, and jumping rope.

How to perform
- Sit on the ground with your right leg extended. Place a foam roller beneath your right calf.
- Bend your left knee so that your foot is resting on the floor.
- Position your hands behind you with your fingers pointing backward.
- Lift your butt off the ground slightly and slowly roll up and down from just below your knee to your ankle.
- Point your toes up and out for proper muscle release.
- Roll for 30-60 seconds on your right leg and then switch sides.
Tip
- Work the sides of your calf by turning your leg from side to side.
- Cross your legs over each other for an even deeper muscle release.
4. Adductors
Your inner thigh feeling tight after sitting for hours in front of your laptop? Try this yoga foam roller exercise for your adductors to release tension, reduce knee pain, and boost your performance in wide-leg activities such as dancing and martial arts.
How to perform
- Lie on your stomach with your right leg extended to one side and your knee bent.
- Place a foam roller under the groin area of the right leg.
- Rise onto your forearms.
- Slowly roll back and forth along your inner thigh.
- Roll for 1-2 minutes on this side and then switch sides.
5. Shin
Shin splints bothering you? This foam roller exercise reduces muscle pain and promotes better blood flow to your shin area thus speeding up the healing process.
How to perform
- Get on your knees and place the foam roller just beneath your right knee.
- Tilt your right leg to the right so that your right shin is directly on the foam roller.
- Place your arms on the floor to support you.
- Press slightly into the foam roller to apply pressure.
- Slowly roll up and down along your shin and pause for 30-60 seconds wherever you feel stiffness.
- Repeat this movement on the other leg.
6. Glutes
This body roller massage for your glutes is great for loosening up your tight hips (we’re talking to you runners and dancers!), alleviating back pain, and improving your posture.
How to perform
- Sit with your butt resting on the foam roller.
- Bend your knees and place your feet flat on the floor.
- Position your right hand behind you for support and your left hand above your right ankle.
- Get into a seated figure-4 yoga pose by lifting your right foot and placing it on your left knee.
- Tilt your torso slightly to the right so that you feel the pressure on your right glute.
- Now slowly roll back and forth across your glute muscles for around 30-60 seconds.
- Repeat this movement on the other side.
7. Hip Flexors
This yoga foam roller exercise for hip flexors reduces your risk of injuries to your hips and knees, prevents lower back pain, improves your running and squatting performance, and enhances your posture.
How to perform
- Get on your knees and place the foam roller just beneath the hip bone on your left leg.
- Use your forearms to support you. Your right leg should be resting on the floor with your knee bent.
- Slowly roll down just a couple of inches and then roll back up.
- Continue this motion for 30-60 seconds on this leg and then switch legs.
Foam roller exercises for upper body
8. Chest
Try this yoga foam roller exercise for your chest to prep your upper body before your weightlifting or racquet sports session.
How to perform
- Lie on the ground with your belly facing down.
- Place the foam roller near your right armpit at the base of your pectoral muscle.
- Your right hand should be extended in front of you.
- Use your left hand and both feet to support yourself.
- Move your hips higher or lower or press into the ground using your right hand to ensure adequate pressure on your chest.
- Now slowly roll up and down along the length of your chest for 30-60 seconds.
- Repeat on the other side.
9. Lats
Tight lats (a.k.a. wings) can hamper your shoulder mobility, and contribute to a hunched upper back and back pain. Release the stress from those tight lats with this yoga roller exercise.
How to perform
- Lie on your side with the foam roller positioned beneath your right armpit.
- Your right arm should be extended with your palm facing upward.
- Bend your right knee in front of you.
- Use your left arm and left leg for support.
- Slowly roll up and down from slightly above your armpit to a few inches below the armpit.
- Roll for 30-60 seconds on your right arm and then switch sides.
10. Forearms
Having achy arms after prolonged tying or mouse use? This body roller massage helps to relax your forearms, improve the range of motion in your wrists and hands and amp up your grip strength.
How to perform
- Get onto your knees and rest your butt on your heels.
- Place the foam roller under your right wrist with your palm facing down.
- Use your left arm to apply pressure on your right arm.
- Slowly roll up and down for 30-60 seconds from your wrist to just above the elbow.
- Now change the angle of your arm such that your palm is facing up and repeat the rolling movement.
- Repeat this rolling motion for your left arm as well.
11. Biceps
All that curling got your biceps in a knot? Try this yoga roller exercise to relax your biceps and improve muscle function.
How to perform
- Get on your knees and place the foam roller parallel to your body on your right side.
- Position the foam roller such that your right bicep is resting on it. Your palms will be facing down in this position.
- Slowly roll up and down from just above your elbow to below your armpit.
- Roll for 1-2 minutes on this side and then switch sides.
Tip
Change the angle of your arms to target all areas of your biceps.
12. Shoulder
Experiencing shoulder pain after bench pressing or lifting heavy grocery bags? Try this foam roller shoulder exercise to roll the pain away!

How to perform
- Lie on your right side with your right shoulder resting on the foam roller.
- Keep your right leg extended and your left leg bent behind you.
- Position your right arm at about a 40-degree angle from the foam roller as shown in the video. Your hand should be turned up and out.
- Use your left hand to apply a bit of pressure on your right shoulder.
- Slowly roll back and forth in your shoulder region.
- When you feel a stiff point, roll over that area for 30-60 seconds.
- After a while, change the position of your arm to foam roll the upper portion of your shoulder.
- Repeat the same movement for the other shoulder.
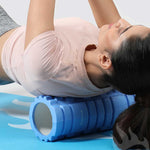
13. Neck
This foam roller stretch for your neck helps to increase the range of motion in the cervical spine, which may enhance neck mobility.
How to perform
- Lie on your back with your knees bent.
- Place the foam roller beneath your neck.
- Slowly move your head to the left and pause at the point where you feel some stiffness.
- Now move your head to the right.
- Repeat this movement for 30-60 seconds.
Foam roller exercises for the back
14. Lower Back
Roll back pain away with this foam roller lower back exercise.
How to perform
- Place the foam roller behind you perpendicular to your body.
- Bend both your knees with your feet flat on the floor.
- Using your right arm for support, lift your butt a few inches off the ground.
- Position your lower back on the foam roller while tilting slightly to the right until you feel enough pressure on that side.
- Slowly roll back and forth from the bottom of your lower back to your mid back.
- Roll for 1-2 minutes on this side and then switch sides.
Tip
Raise your hips or bring it down lower to adjust the pressure on your lower back.
15. Upper Back
This foam roller upper back exercise is excellent for releasing tension in your upper back, promoting better posture, and enhancing the flexibility and movement of the thoracic spine.

How to perform
- Lie down on the floor with your knees bent and feet flat.
- Place the foam roller beneath your mid back.
- Interlace your fingers and use them to cradle the back of your neck to avoid strain.
- Lift your butt a few inches off the ground.
- Now slowly roll back and forth between your mid back to your shoulder blades.
- Roll for 1-2 minutes.
Tip
When you find a tight spot on your upper back, you can rest your butt on the floor and extend your upper body over the roller.
You might like: 12 Simple But Effective At-Home Body Toning Exercises For Women
Conclusion
Whether you want to relax your sore hamstrings after a long run, massage your glutes to get rid of that nagging back pain, or warm up your muscles before your workout session, a foam roller is your one-stop solution.
Unlock the power of self-myofascial release with foam roller exercises, and roll your way to a more flexible, pain-free, and empowered you!
Leave a comment